This post is going to build toward
talking about the UA game, but it's also going to be my first general
introduction to some important concepts in defensive football. We're
going to look at some defensive structures before getting into the
problems that UA caused for them.
I wrote the bulk of this post before the CU game, so some new issues obviously came up. I won't comment on much of that here, so this post is really just an isolated commentary on our UA gameplan. I'll also say that I couldn't bring myself to break down last year's defense, and I've since deleted all digital memory of that horrible season, so I can't immediately compare it to Buh's defense except on a general level. Theoretically it'd be awesome and really informative, but for me the ratio of frustration to value wouldn't be worth it when we have the current season to talk about.
I wrote the bulk of this post before the CU game, so some new issues obviously came up. I won't comment on much of that here, so this post is really just an isolated commentary on our UA gameplan. I'll also say that I couldn't bring myself to break down last year's defense, and I've since deleted all digital memory of that horrible season, so I can't immediately compare it to Buh's defense except on a general level. Theoretically it'd be awesome and really informative, but for me the ratio of frustration to value wouldn't be worth it when we have the current season to talk about.
Defensive Concepts
I've already talked a little bit about coverage shells and the most
general characteristics of each coverage, so this post will talk more
about fronts and techniques in an effort to fingerprint our defense.
To get started talking about defensive fronts, let's recall the way
that gaps and DL assignments are called.

Run defense operates on the understanding that, because a
ball-carrier can't run through another human being, as long as the
defense can cover all of the spaces, or “gaps,” between offensive
blockers, they should be able to shut down the run. Therefore, the
defense won't be worried about individual blockers per
se,
but rather about open spaces on either side of those blockers. These gaps are labelled with a letter
starting from the inside out. The gaps outside the center are the
A-gaps, the gaps outside the OG's are the B-gaps, the gaps off-tackle
are the C-gaps, and anything outside a TE (or far outside an OT when
there is no TE) are the D-gaps. So, when you teach your defense what
their assignments are, you'll tell the NT that he's responsible for
the A-gap, the DT that he's responsible for the B-gap, etc., and
you'll make sure that you've assigned each gap to someone. So how many gaps are there? If X = the number of blockers, then the number of gaps = X + 1. A spread formation with just the five OL as blockers will be best defended with six front defenders, an I-formation with 5 OL + 1 TE + 1 FB will be best defended with eight front defenders, etc.
This is different from the way that you'll call alignments.
Alignments are labelled by number, and tell a defensive player where
to line up relative to an offensive blocker:

Even numbers indicate that the defender should line up heads-up over
the offensive blocker. Odd numbers indicate that he should line up
shaded outside of the blocker, and even numbers with an “i” added
mean that he should line up shaded inside the blocker. These numbers
increase as you work from the inside out. So, a 0-technique lines up
heads-up over the center. A 2-technique lines up heads-up over the
OG. A 3-technique lines up in an outside shade on an OG, and a
2i-technique lines up shaded inside an OG. The TE numbering is weird
and I'm not sure anyone knows why, but for whatever reason an inside
shade on a TE is called a 7-technique, while an outside shade on the
TE is a 9-tech.
The combination of a player's alignment (technique) and assignment
(gap) tells you how the play is going to work. So, a typical
alignment and assignment might tell your DT to line up in a
3-technique and to play the B-gap:

Whatever he does, he can't let the RG get outside of him (or the RT get inside of him). It's OK if
he gets blocked a little so long as he can stay in between the RG and RT, because as
long as he's doing that he's got the B-gap covered.
You can also use this system to indicate line movement. I could have
that DT line up in a 3-technique, but then angle inside to the A-gap:

No matter what the defensive call is, every player in the front will
be given their alignment and assignment according to this system.
The assignments for individual players will look something like that.
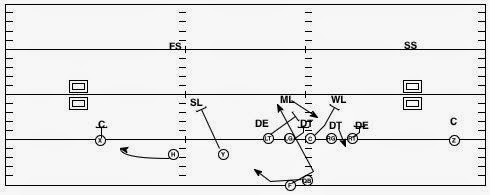
From that nomenclature we can start building up into different
defensive structures. The two most common defensive fronts in the
4-3 are the “shifted” fronts referred to as “over” and
“under.” These fronts are said to be “shifted” because they
put a DL over the C, and only one of the offensive guards.
Whichever side has the OG covered, we can say that the defensive line
is “shifted” in that direction. This “shifted” side of the
formation is most commonly called the “reduction.” The
characteristic feature of an “Over” front, then, is that the
reduction is set to the TE:

This front is shifted toward the diagram's right, where we're
covering the C and the RG, and away from the diagram's left,
where the LG is uncovered. In terms of our nomenclature, in a
typical over front, on the TE side of the diagram the DT is a 3-tech
and has the B-gap. The DE is a 7-tech and has the C-gap. Away from
the TE, the NT plays a 1-tech and has the A-gap while the DE plays a
5-tech and has the C-gap. To simplify things for talking about the
LB's, we can say that the SLB has the D-gap outside the TE, the MLB
has the A-gap to the TE side, and the WLB has the B-gap away from the
TE, although as we'll see LB assignments are more complicated than
this.
This is contrasted with the “under” front, which shifts the DL
away from the TE:

The under front puts the reduction away from the TE. So, from left
to right, the DE is a 5-tech C-gap player, the DT is a 3-tech B-gap
player, the NT is a 1-tech A-gap player, and the DE is a 5-tech C-gap
player. Because this front is shifted away from the TE, it'll also
put the SLB on the LOS as a 9-tech D-gap player to get an extra guy
on the LOS. The MLB has the B-gap to the TE, and the WLB has the
A-gap away from the TE.
Why does it matter where you put the reduction? Don't you have all
the gaps covered regardless? Basically, it all comes down to who's
controlling which gap. It's hard to run through a gap that a DL is
covering, and for some blocking schemes it's impossible. The DL are
275-300 lb. guys doing their best not to move, and for the most part
they're responsible for one gap and only one gap. On run plays
they're stuffing that one gap, and on pass plays they're pass-rushing
through that one gap. There aren't a lot of blocking schemes that
can get them out of there. Accordingly offenses want to attack the
“soft” gaps that are covered by LB's. LB's are starting out off
of the LOS, they have to worry about reading run or pass, and they
have to flow with the ball on lateral plays. Basically, there's a
lot going on for the LB's that keeps them from racing straight
downhill into their gap, making it easier to block them out of their
assignment. When a DC is choosing where to place the reduction he'll
have this in mind. Say that an offense's best running play is to the
TE-side B-gap. Well, the DC might call an over front, which will put
a DT in that gap and make it hard to run that play. This is just one
out of many considerations, as we'll see below.
Art Kaufman's
Defense: Front Play
It looks to me like our base defensive call is Under Cover-4
(although we do mix in a fair amount of Over, and in coverage we play
Cover-0 and Cover-1 with varying degrees of frequency according to situation and gameplan). If any of you read my BI post on
Buh's defense long, long ago, this might terrify you, because it's
the same base defense. The devil is always in the details, though.
There are only a limited number of defenses that most college teams
base out of (generally either the over, under, or odd (classic 3-4)
front combined with Cover-1, Cover-2 (or 2-man), Cover-3, or Cover-4
behind it), but there are tons of ways to play each of these fronts
and coverages. So, calling our defense a 4-3 gives you almost no
information. Calling our defense an Under Cover-4 is a little
better, but still won't distinguish it from many of the other defenses
out there. For the rest of this post, we'll look at some little
details that make our defense what it is.
In the previous section I talked about placing the reduction either
to or away from the TE side of the formation. We've played against a
lot of spread formations that use no TE, so our front obiously can't
be set based on where a TE lines up. We usually run an under front,
meaning that we'll put the reduction away from the “strong side”
of the formation. For now, we'll define the strong side as the side
with the most WR's:

In this diagram the left side of the diagram has 3 WR's while the
right side only has 1, so we'll designate that side as the strong
side. Because we're running an under front, this means that we'll
place the reduction away from the strong side, or to the single
receiver side. In terms of gap assignments, even though the offense
is in a spread trips formation, the run assignments are no different
from what we saw above when there was a TE. The space between the LT
and Y is still the C-gap, and the DE is still responsible for it.
The space outside of Y is still the D-gap, and the SLB is still
responsible for it. The main other difference is that the SLB lines up off the LOS to put him in better position to cover something like a slant by H, and so that he can see his keys on the OL and in the backfield better.
When the offensive formation doesn't have a clear strong side, we'll
set the reduction to the RB's alignment:

In this diagram there are two WR's on each side of the formation,
meaning that neither side has more WR's. The RB is aligned to the
right of the diagram, so we set the reduction to that side.
Those are some of the ways that we'll set our base front. Above I
mentioned that, although many teams run Under Cover-4, the devil is
in the details. I also mentioned that LB assignments are less
straightforward than I made it sound. Well, those LB assignments are
the kinds of details that I'm talking about, and right off the bat we
can see some differences from what we were running with Buh.
First, how is run defense supposed to work, in more detail? In any
defense, LB's can't just blindly rush into their gap. Let's see why:

This is a spread version of “power” against our base defense.
From the diagram it looks like the RG is pulling through the hole to
block the MLB, but in reality thinking of him as blocking the MLB
doesn't fully describe the problem.
What this play is really doing is removing a gap from the right side
of the formation and inserting it into the left side of the
formation. On the right side of the formation before the snap there
is an A-gap outside the center, a B-gap outside the RG, and a C-gap
outside the RT. When the RG leaves, however, there is just one big
gap between the center and RT where there used to be two gaps (one
between the center and the RG, and another between the RG and the
RT). Meanwhile, pre-snap on the left side of the formation there was
an A-gap outside the center, a B-gap outside the LG, and a C-gap
outside the LT. When the pulling RG inserts himself between the LT
and LG, he splits the B-gap into two separate gaps (one outside of
him, one inside of him). If the WLB just blindly rushes downhill at
the snap, the defense won't have the numbers that it needs to stop
the play:

Whichever side of the pulling RG the MLB attacks (I've drawn him
attacking the outside shoulder of the RG here), the RB can cut to the
other side and gain yards. In order to stop this play, the WLB has
to recognize that the RG is pulling and follow him across the
formation:

Put into the terms we've been using, the pulling RG takes a gap away
from the right side of the formation and re-inserts it on the left
side of the formation. If the defense is going to stay gap sound,
they also have to take a defender away from the right side of the
formation and insert them to the left. The MLB can then attack the
outside shoulder of the pulling RG while the WLB attacks his inside
shoulder. The defense stays gap sound.
So the LB's (and to some extent the DL) can't just rush their gaps,
they have to read the offense's blocks and react in the correct way
to counter them. The details of Kaufman's specific brand of Under
Cover-4 are all about how they're taught to react to different kinds
of plays. Let's see how the run fits worked against just one of UA's
favorite plays and formational tendencies.
Here's a classic UA/UO-style play. Early in the game UA wanted
to run inside zone toward the reduction and away from trips:

The actual playcall here is to hand the ball off to the RB. All of
the other bells and whistles attached to this play are just ways to
protect that running play by punishing the defense for overselling to
stop the RB run.
For
the inside zone part of the play, the OL is zone stepping to the
right. The RT will block the DE, the RG will block the DT, and the C
will release to LB level. The LG will take the other DT, and the LT
will release to the MLB.
The
key block here is the RG vs. his DT. This block is the RB's first
read, and he cuts off of it. He has a number of choices depending
on what happens. He's seeing whether the DT goes inside or outside
of the RG. Say that the DT goes outside the RG and plays hard into
the B-gap:

In this case, the right A-gap should be open. If the WLB tries to
fill that A-gap, the C will have a great angle to block him (as shown
in the diagram above). The RB will cut to the left of the RG and get
downhill. What if the MLB gets over the top of the LT and into that
A-gap?
If the MLB comes over the top, as I've drawn, or if the A-gap is
otherwise filled, then the RB will cut it all the way back and get
yards inside the DE. What if the DE crashes down to take the RB
on that cutback?

This is where the offense wants to start punishing the defense for
selling out to stop the RB run. In this case the QB should keep the
ball, read the SLB, and decide either to keep the ball himself or to
throw the bubble screen to H. As a side note, we can see from this
set of rules that the old-school option defense of hitting the QB on
every play doesn't work against the zone read. If the DE plays the
QB, either by slow-playing him or straight up hitting him, then the
QB will just hand the ball off and there won't be anyone in position
to defend the cutback by the RB:

What's a defense to do? The offense has an answer no matter what
happens! Well, not quite. The defense CAN take it all away, and
here's how we did it against UA:

This all starts with the defense recognizing the RB's alignment and
reading the blocks of the OL. This does not appear to be a stunt
that is called in from the sidelines. Rather, the defense is ready
for the tendency based on the offensive formation and reading the
blocks of the OL. If the OL zone steps to the right, that sets the
chain of events in the diagram above in motion. On the right of the
diagram, the DT and WLB see the OL zone stepping towards them. The
3-tech DT falls inside the block of the RG into the A-gap, where he
bangs into the center and prevents him from getting to LB level. The
RG is still trying to block that DT, so the DT is able to take out
two blockers (C and RG) all on his own. Meanwhile the WLB takes the
B-gap hard. This automatic stunt takes away the front side zone
play, forcing the RB (if he gets the ball in the first place) to cut
back. On the backside, when the DE sees the OL stepping away from
him, he crashes down hard and plays the cutback. Because the DE
crashes down on the RB, however, the QB should keep the ball. That's fine, because we're scraping the MLB
to the outside as the QB player. This is a read that the MLB is
making. When he sees the OL zone stepping away from him, he comes
around outside of the crashing DE. This leaves the bubble
screen as the only option left, but we're assigning the safeties to
any bubble screens. This gives us a 3-on-2 advantage (X and Y
blocking vs. the CB, FS, and SLB):
We wouldn't game-plan the reads like this against every team, but because UA often runs this particular play, we do. Most importantly, although there are a lot of moving parts, the reads are simple: For everyone in the defensive front, they just ask if the OL is zone stepping toward them or away from them, and react accordingly. For the safety, he hardly has to worry about the run at all. He keeps an eye on the receiver that he's already covering, and the second he sees him bubbling for the screen he flies downhill. Easy.
This solution shows a key way in which our defense this year differs
from Buh's, at least as far as I can tell with my limited breakdown
of last year's defense. Buh wanted to involve the safeties against
the run in order to outnumber the offense. Last year Michael Lowe was our leading tackler, Cameron Walker was third, and Avery was all over the place before he got hurt. That's not all because defenses completed a lot of passes against us. This increased responsibility unfortunately also put
the safeties in run-pass conflict. On pass plays they had to drop
back and be deep defenders, while on run plays they had to fly up to
the line of scrimmage. This isn't as crazy as it sounds and is a
reasonably common way to play Cover-4, but we clearly couldn't make
it work. As a result, our safeties easily got caught looking into
the backfield on playaction passes, and we gave up a ton of big
passing plays as a result. Our CB's probably looked worse than they were last year because of these safety assignments.
Kaufman,
even though he's running the same front and coverage, involves the
safeties in the run game much less, at least against these spread
sets. He only asks the safety to line up over his receiver, and to
fly up on him if that receiver runs a screen. In general, Buh wanted
the LB's and DL to spill runs out to the sidelines, where the
safeties could clean up. We often failed to do this, resulting in
those massive outside runs that we saw so much of last year.
Kaufman, on the other hand, puts much more of the onus on the LB's.
He wants to keep all runs inside the OLB's so that the rest of the
defensive front can make the tackle in pursuit, and as a result Jefferson and Barton are our leading tacklers this year. This does ultimately
make us more vulnerable to cut-backs (this is something that I've
seen going back to his Cincinnati defenses), but that's where the
safeties can come up and at least stop the play from going for big
yards. If we start to see big runs up the middle, we might have to
rethink this strategy, but for now it's working.
This element of our UA game plan let us do several things: (1) it let
us defend the run with a 6-man box. If you check out my post on ourown QB run game, you'll see that the defense needs a 7-man box to
have good numbers against 5 OL + 1 RB + 1 QB. Our auto-checks to the
stunts described above messed up UA's run blocking schemes and let us
defend Solomon and Wilson with only 6 men, giving us an extra
defender against the pass and screens. Also, by making our OLB's our
primary run force on the ouside, we've freed up the safeties and
limited some of the plays that killed us last year: Certain types of
screens, QB runs, perimeter runs, and easy deep passes down the middle of the field. As bad as the defense has looked at times this year, we aren't giving up more against runs between the tackles, and we're greatly improved against several of our weak spots from last year.
Art Kaufman
Defense: Coverage
So where do things go wrong? Against UA (and CU), things go wrong
against the pass, and mostly against the quick passing game. Before
getting into coverage, let's talk for a minute about Anu Solomon: A
lot of people are saying that they aren't impressed with him as a QB,
and to an extent I have to agree because of a lack of versatility.
He has three throws that are his bread and butter: The hitch, the
slant, and the fade. He doesn't seem comfortable reading floating
safeties and LB's in the middle of the field, and I don't see him
working many multiple receiver concepts downfield. This doesn't mean
he won't be a good QB, since Goff had a lot of the same problems last
year and has since corrected them, and Solomon and his WR's are way
ahead of where Goff and our WR's were last year on the fade. Right
now, though, he's limited. Fortunately for UA, these throws
complement each other quite well.
Getting back to coverage. We've already looked at some basic coverage shells in another post, so let's talk a little more about
technique, and the different ways that a CB can line up on a WR. The
tightest coverage will come by lining up 1-yard off the WR and
pressing him. If you don't want to do that, you can play off of him
(with the depth depending on the coverage) with either inside or
outside leverage. When you line up inside of the WR, you're
partially conceding routes with an outside release but putting
yourself in position to stop inside releases. Playing with outside
leverage is the opposite. When you're playing with leverage, you'll
want a second defender who can help on the routes that you're
partially conceding. So in Cover-2, the CB will line up with outside
leverage on the WR and will prevent him from taking an outside
release. Meanwhile the safety is inside and over the top. The CB
uses his leverage to force the WR inside to the safety, and the
safety's inside alignment lets the CB play hard against outside
stuff. The CB protects the safety, and the safety protects the CB.
Their respective leverages complement each other:

The problem with UA, in part, was that the fade has an outside
release, while the slant has an inside release:

When you press a WR and he beats you on each of these routes a few
times, you can get caught guessing, and your play against both routes
can deteriorate as the game goes on. If you give up on the press and
play off of this WR with inside or outside leverage, then that impacts the
rest of your coverage. A defense is like a spider web; if you pull on one part of it, every other part of it will change to some degree. If you play with inside leverage to take away
the slant, you need another player deep and outside to help on the
fade:

This, in turn, affects the way that the rest of your deep coverage has to play, and so on. If you play with outside leverage to keep the fade from getting to
the sidelines, you want an inside short player to take away the
slant:

Those pictures look like pretty good options, right? Wrong, because
the offense has two or three other receving threats in the game:

This is Cover-2. Here the CB's are playing outside leverage, and
would hypothetically force the fade inside to the safety near the
hash marks. This puts them in a bad spot against the slants that're
being run, though. The next defenders inside of them are the OLB's,
but they're in a bind. If they cut the slants by the outside WR's
(the dashed lines), they leave a lot of space for the slants by the
inside WR's. If they stay inside the inside WR's (the solid lines),
they leave a big hole for the outside WR's. The MLB can only take
one of the inside WR's slants and really needs to be on the lookout
for a route by the RB anyway, so the defense is in a bad spot here.
What about other kinds of leverage?

Here the defense has rolled coverage to the diagram's left and is
playing Cover-3. The problem here is that you can only roll coverage
to one side of the formation. This might take away double slants to
the left of the diagram, but on the right of the diagram you can't
take both slants, at least if we're assuming that we need to have at
least one LB (MLB) in the box to defend the run.
The simplest solution to these problems, by far, is to have the CB's
press:

The CB's play tight coverage on the slants by the outside WR's, and
the OLB's can sit with inside leverage on the slants by the inside
WR's. It's can also be good against the fade if your CB's are
physical, because they can get a good jam to take speed off the route
and can then force the WR to the sidelines so that there's no space
for the QB to fit the ball into. This is what we would've liked to
do, and if we could've upped our percentage of success against either
the slant or the fade from the press it would've worked.
Unfortunately, our CB's are overmatched against good WR's with size.
It's not just Cayleb Jones. Now against UA and CU, whenever we have
our CB's covering the fade, opposing WR's are almost always more open
than our own WR's are on similar routes, and our WR's are pretty
good. If we had Marc Antony, 2008 Darian Hagan, 2008 Chris Conte before
he moved to safety, or even SQT (just to show it's not all about
size), we beat UA and the CU game is much more convincing. All of
those guys, regardless of measureables, defended the fade much better
than anyone we have right now. More length would also help us break
up some of those slants from a press alignment. More length means
longer arms, making it easier to get a good jam on a tall WR. As it
is, our CB's don't have the combination of size, strength, or
technique that we need. Our best hope of a quick fix is for Darius
White to get things figured out, but the potential of that is all
based on physical stats right now, and those are kind of meaningless
when compared to all of the other factors that make a good football
player. If you can't press, then you're back to playing the leverage
game, with all of the accompanying problems that we saw above.
There
are a number of things we could do to try and disrupt this, but I've
given too much info too fast as it is, so let's try to get a group
discussion going. Obviously we aren't college-level coordinators and
won't solve anything, but discussions like the one I'm about to
propose will help make sense of different coverages much better than
any of my posts can, so let's try this: These are three plays that
caused us repeated problems in the 3rd
and 4th
quarters:
Hitch:

All slants:

Verticals:

You have 11 guys, and you need a call that can defend these three
plays. Preferably, you'll also want your call to limit huge runs
even if you're willing to concede some things in the run game.
Assume Cayleb Jones is the left outside WR (X). Give me your
personnel group of choice, tell me where you want them to line up,
and give me the coverage rules that will let you cover all three
concepts. I'll draw up any suggestions and post them in the
discussion thread, and we'll hopefully get some good conversation going.
No comments:
Post a Comment