You wouldn't know it from my earlier
posts, but defense is my favorite side of the ball. I've focused on
offense so far in part because that's what our coach is supposed to
be known for, but mostly because I don't hate myself enough to break
down last year's defense. Now that I've written some posts on our
offensive positions, formations, and the way that our plays are
supposed to work, I'm going to start incorporating some more info on
defense by looking at interesting things that opposing defenses did
to stop us. The goal of these posts is both to teach defense from
the ground up, and to show the most interesting strategies that were
used against us. This post will look at some basics of a few zone
coverages before moving on to a particular Cover-3 variant used by
Northwestern.
Zone Coverage Primer
To understand zone coverage, you need to understand how defenses
divide up assignments:

Image taken from glazierclinics.com
There's nothing too tricky here, and a lot of these terms are things
you've probably already heard. To summarize quickly, all defenses
are going to divide the underneath passing zones into five. There's
a hook zone in the middle, curl zones outside of that, and flat zones
outside of those. You can also divide the hook zone in two for
talking about certain coverages, but that's not a major distinction.
For the deep zones, you can have anywhere from two to four defenders
dividing up the field, and they'll usually divide it up
evenly. What makes the various zone coverages different is how you
distribute your back-7 defenders across these zones.
For this post, we'll mostly be interested in underneath coverage.
There are five underneath coverage zones because five is the number
of defenders you need to truly shut down the short stuff. Cover-2 is
the optimal pass defense because it does just this:

To put this in terms of pass zones, there are CB's in the flats,
OLB's in the curl zones, and the MLB in the hook zone. That leaves
you with two safeties to defend the deep stuff, and so they divide
the deep field into halves.
Any
zone coverage with less than five players underneath will require at
least one defender to cover two of those zones. This is especially
the case with quarters (Cover-4):

In this coverage you have four deep
defenders, which only leaves your three LB's to cover the five
underneath zones. This means that your OLB's have to play “curl to
flat.” They'll start out in the curl zones, and widen to the flats
if necessary. This is really a tough assignment against a
well-executed short passing game:

Here the outside receiver is running a
curl and the TE is running a flat route. The SLB is in a bind
because he's responsible for covering two zones. If he runs to the
flat (the solid line in the diagram) then he'll go right past Z, who
will be in a massive void in the curl zone. If he stays under the
curl by Z (the dashed lined in the diagram) then Y will be open in
the flat. Because the SLB is responsible for two underneath zones,
the offense can stretch him by putting a receiver in each of those
zones.
The upshot of all this is that on every
play the offense wants to identify the coverage and, in so doing, the
flat defender on each side of the field. If the coverage forces the
flat defender to be responsible for two zones then they want to
attack him, and there are a number of pass concepts that are designed
to read him. This is one of the most important
concepts in terms of thinking about zone coverages and how to attack
them.
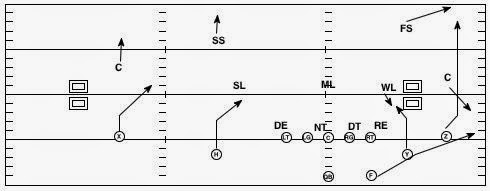
In between Cover-2 (five underneath
defenders) and Cover-4 (three underneath defenders) we have Cover-3.
The standard version looks something like this:

When compared to the Cover-4 diagrammed
above, you can see that the defense has simply dropped one of the
safeties (the SS) into underneath coverage and moved the other safety
(the FS) into the deep middle of the field. This gives the defense
four underneath defenders, and also lets a DB, who is naturally
better in coverage than a LB, help in underneath coverage. We can
see how this will unfold against our curl/flat pattern:

To the left of the diagram this
coverage is just like quarters: The WLB is still a curl to flat
player, and the MLB is still a hook player. On the right of the
diagram, the defense now has two players where they used to have one.
The SS is playing curl to flat, and the SLB is playing hook to curl.
This lets the SS widen with Y while the SLB drops underneath Z (in practice you're still probably going to have a void in the curl zone in between when the SS moves out to the flat and the SLB can get over, but it's going to be tighter). We
can say that the secondary is “rotated” to the right side of the
diagram; while quarters and Cover-2 are balanced coverages with two
DB's on each side of the formation, Cover-3 involves a rotation of
the secondary such that the coverage is stouter on one side of the
field than the other.
There is one more major type of zone
coverage that I should mention, and that's the
self-explanatory quarter-quarter-half coverage (Cover-6, because it's
Cover-2 + Cover-4):

This is just Cover-2 to the right side
of the diagram and Cover-4 to the left. In terms of underneath zones
from right to left, the CB is a flat defender (like he would be in Cover-2), the WLB is a curl
defender, the MLB is a hook defender, and the SLB is a curl-flat
defender. For deep coverage, the FS is playing a deep half, and the
SS and the other CB are playing deep quarters.
This presentation of zone coverages has
been very simplistic, and there are many more things we could talk
about.
One area that I'll get into now is some variations in assignment within these coverages. For now I want to
focus on some variants of Cover-3 that we saw in the Northwestern and
Ohio State games.
If you've looked a little bit at the X's and O's of different coverages, the version of Cover-3 given above
is what you're probably used to seeing. In actuality, it's just one
variant called “Cover-3 Sky.” In this variant, Sky
tells us that a Safety
is the flat defender to the side of the secondary rotation. There's
another variant called Cover-3 Cloud:

This
is still Cover-3 and has most of the advantages discussed above
because of a secondary rotation to the right side of the diagram.
The difference is that the tag Cloud
tells us that the Cornerback
will be responsible for the flat to the side of the secondary
rotation. When compared to Cover-3 Sky, this is just an assignment
switch between the SS and the CB. A major difference is that the CB,
because he's lined up farther outside pre-snap than a SS would be,
has better leverage for playing out-breaking routes. In the diagram above, for
example, you can see that he's in prime position to defend the flat
route by Y. Northwestern used this variant several times, and we'll
return to it below.
Above, I mentioned that the offense
wants to ID the flat defender on each side of the formation and
determine whether or not he's exploitable. Vulnerable defenders will
be guys like the OLB's in Cover-4, or the WLB in Cover-3. The
defense, knowing that this is what offenses like to do, will have
answers to this, and this is where Cover-3 variants can cause
problems. Let's imagine that a team lines up in a Cover-4 shell and
then rotates to Cover-3 Cloud at the snap:

Say that the defense has been playing
some Cover-4, and the OC expects them to do so again. They line up
in a Cover-4 shell. The QB, expecting the CB to bail to a deep
quarter (the dotted line in the diagram) will mistakenly identify the
SLB as the flat defender. For our curl-flat pattern he'll read that
SLB, and will throw to whichever route he doesn't cover. The problem
with this is that the CB isn't bailing to a deep quarter, because
this is Cover-3 Cloud and he's actually the flat defender (the solid line in the diagram).
The QB will see the SLB covering Z on the curl route and will look to
throw to the flat, where the CB will be in perfect position to make
the play.
A disguised Cover-3 cloud can force a
bad throw to the flat, and this was an important part of
Northwestern's strategy in the second half. Ohio State used another
Cover-3 variant called Cover-3 Buzz:

Once again they ran this from a Cover-4
shell. The difference is that the Buzz tag makes the
backer
the flat defender to the side of the secondary rotation (the left in
this diagram). Meanwhile the SS drops into the curl zone, while the
CB's and FS play deep 1/3's on the back end. Why is this variant
effective? When the QB reads the defense, he'll read it as quarters
and ID the SLB as the curl-to-flat defender. Unlike in Cover-3
Cloud, he's actually right here because the SLB is
the flat defender. He'll see the SLB go wide with F, and will look
inside to throw to H in the curl zone. The problem is that this isn't
Cover-4, it's Cover-3 Buzz, so the SS is dropping into perfect
position to make a play.
As
a final note before looking at some specific plays from the
Northwestern game, I should say that Goff doesn't really get confused
by all of this. His first read post-snap is to the safeties, so no
matter who's dropping into underneath zones, if he sees a safety
rotating to the deep middle he knows what's up. More importantly, he
consistently goes to the right place with the ball when he sees this.
Keep this in mind while reading the next section.
Northwestern and Cover-3 Cloud:
With 3:47 left in the game Northwestern was ahead 37-30. Their QB
Trevor Siemian had just thrown an INT to Alex Logan, giving the Bears
the ball on the 50 yard line with plenty of time to tie the game.
Goff dropped back to throw deep to Chris Harper, only to see the ball
intercepted at the 9. For various reasons this looked like a frosh
QB making a rookie mistake, and to an extent that's true. This play
is part of a larger story, however, and really illustrates that every
success or failure on the football field has a history, and is the
end result of a game-long strategic battle between the players and
coaches on each side.
To
fully understand Goff's interception, we have to rewind the tape
about nine minutes to the 12:30 mark in the 4th
quarter. Our offensive playcall is “Stick,” a quick-game concept
that's worked up to this point to the tune of 6/8, 49 yards (BTW, if
you memorize anything from these posts it should be Stick, followed
closely by Power, Y-Cross, and 4-Verticals):

Goff
read this pretty well all night, as the stat line suggests. Three
times Northwestern was in Cover-1 (man coverage with a FS deep), and
he shredded them with the slants to the two receiver side (3/3, 32
yards). He also read some secondary rotations correctly and threw to
the side away from the rotating DB. On another occasion he completed
this concept against a zone blitz. Northwestern had also tried to
defend this with some Cover-6, but Goff correctly threw to X on the
backside slant:
This
was a play that Northwestern needed to stop, and in the 4th
quarter they got into a good call:

The Wildcats disguise the coverage by lining up in a Cover-4 shell
and then rotate to Cover-3 Cloud, with the secondary rotation going
to the field side of the formation. This call means that the CB on
the left of the diagram is free to squeeze the slant by X, because
the SS is rolling to a deep 1/3 behind him in case X goes deep.
Because the CB is playing the flat, the SLB only has to worry about
the curl zone, giving him great leverage to stop the slant by H. To
put this in the terms that we discussed above, the Cover-3 Cloud call
rotates the secondary toward the slants, meaning that none of the
underneath defenders to that side are responsible for two zones.
Cover-3
can only balance out the numbers to one side of the formation,
however, because it only has four underneath defenders. On the other
side we should be golden, because the WLB should be stretched by the
routes of Y and F much like we saw with the curl/flat combination
discussed above. This is where the final wrinkle comes in:
Northwestern has their rush end playing a “peel technique,”
meaning that he rushes the passer unless
the RB releases as a receiver, in which case he drops out of the
rush to cover him in the flat. This means that the WLB doesn't have
to worry about F in the flat, and can instead focus on Y coming into
his curl/hook zone. This peel technique by the end gives
Northwestern a defender in all five underneath zones. Goff sees the
safety rotating to the deep third and correctly looks to the stick by
Y (away from the secondary rotation). He sees that this is covered
and looks to the slants on the back side (all covered) before
throwing up a late ball to Harper (Z). Because the ball's late, the
safety who had been rotating toward the middle of the field has time
to come back over to Harper and break up the pass for a near INT.
Now
we can return to the INT. Remember that above I mentioned how
consistently Goff reads this concept correctly. Also remember that,
at 12:30 in the 4th,
he only threw to Harper as a last resort, after seeing that
everything was covered on both sides of the field. Also remember
that even though the ball was late, the safety had only gotten a
“near” INT.
On
the play with the actual INT, Goff doesn't look at the underneath
routes at all. He looks at Harper all the way and throws to him as
soon as he clears the LB's. I highly doubt that he went rogue for
this one play and made a bad read trying to be a hero, because we
just haven't seen much of that out of him. Instead, I think that
this route was tagged to go to Z all the way if there was a secondary
rotation. Goff looks at the safety, sees him rotating toward the
middle of the field, and tries to hit Harper down the seam. This
isn't, in itself, a bad adjustment. Teams throw seam routes against
Cover-3 all the time at every level of football. The problem is that
we weren't controlling the safety in any way. One way to control him
would be to run a seam at him from the other side of the field:

The
QB could then just read the FS, and throw to the route that he
doesn't take. I haven't seen us vary our quick-game concepts to this
extent, though, so short of calling a different play (probably the best option option if we suspect that we'll see this coverage) the simplest way to control him might ultimately
just be to have Goff move him with his eyes, looking to the slants
while Harper clears the LB's, then gunning a throw down the seam.
Instead Goff never looked anywhere else, letting the safety get the
INT even though the ball was thrown earlier than it was on the previous play. Another option is that if they want to use a DE to
cover a RB, force that DE to cover a RB with something like a
post-wheel combo:

The
nice thing about this switch-up is that it doesn't alter the stick
concept in terms of route distribution, so if the defense actually is
playing quarters you can just make your normal reads. I don't know
to what extent this kind of adjustment is built into our offense,
though, especially in year 1. My hope is that we'll see more of
these minor tweaks as we get more settled in the offense, because
while we have concepts that work well against the most common
variants of each coverage, when the defense makes minor changes we
need to be able to do the same.
Film
Study:
In
the following youtube video I've looped three clips from the TV
broadcast. The first is the near INT at 12:30 in the 4th, the second
is the INT at 3:48, and the third is a full-field replay of the INT.
The first two shots are looped four times each, so to see everything that
I've talked about I'd recommend the following order as the play repeats: Just watch the first loop to see what's going on and note
where the RB lines up. We always run Stick toward the RB's
alignment, so that will be the three receiver side that we see in the
diagrams above. On the second loop, watch that side specifically to
get a sense for the route combination. On the third loop, watch the
receivers on the other side of the formation to get a sense for what
they're doing. On the fourth and final loop of each play, watch the
deep coverage so you can see the safety rotation. The more you do this kind
of thing, the better you'll be able to ID'ing this stuff as you watch
live or on TV. The full-field replay is only looped twice, but
that'll show you the motion of the entire defense and let you pick up
any details that may have been hard to see:
For
any questions or discussion, check out the BI thread here:
No comments:
Post a Comment